User List
Last updated: April 22, 2026
You can navigate to the user list by clicking the “Settings” tab in the side navigation. From there, click on the “Users” tab across the top of the page. See below for a detailed description of the user list.
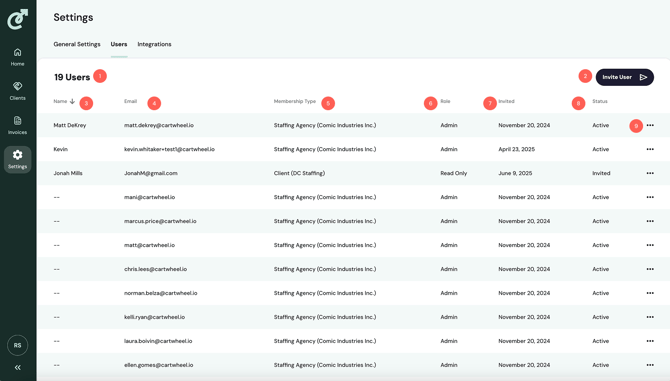
User Count
The user count displays the number of users in the system.Invite User Button
Click this button to invite a new user to the system. For more details, refer to the Inviting New Users article.Name Column
This column displays the user’s name, if available. Name is not required, so there may be users without a value in this column. You can click on the column header to sort the list of users by name.Email Column
This column displays the user’s email address. You can click on the column header to sort the list of users by email.Membership Type Column
This column displays the user's membership type. There are two possible membership types. The first is “Staffing Agency,” which means the user has access to all invoices and other sections of the system, including the homepage and settings. The name of your staffing agency will display in parentheses next to the “Staffing Agency” type name.
The second membership type is “Client,” which means the user only has access to invoices for a single client. They will not have access to anything else in the system but a list of invoices. The name of the client the user has access to will display in parentheses next to the “Client” type name.
You can click on the column header to sort the list of users by membership type.Role Column
This column displays the role the relevant user has been granted. There are two role types. The first role type is “Admin,” which means the user has full permissions throughout the system to create, edit and delete objects.
The second role type is “Read Only,” which means the user only has permission to view objects in the system.
Users with Client membership types will always be read-only. You can click on the column header to sort the list of users by role.Invited Column
This column represents the date on which the user was invited to the system. You can click on the column header to sort the list of users by invitation date.Status Column
The status column displays the user's current status. There are three possible statuses: Active, Deactivated, and Invited. You can click on the column header to sort the list of users by status.Action Menu
Clicking the three dots on the far-right side of each row opens the action menu. From this menu, you can edit, deactivate, or reactivate the user, depending on their current status.